Tuesday, April 24, 2012

You're "tea-rrific"

My mother runs a volunteer tea at her local teahouse and she asked me for a set of thank you cards that could be sent to her volunteers. I made 3 sets of 4 cards each. These first 2 sets use a computer generated sentiment and die cut shapes - Die-namics "Always Time for Tea". To make the piecing together easier, I first ran strips of the patterned paper through my Xyron. Then when I cut out the die cut pieces, I could just peel off the paper backing to uncover the adhesive (homemade stickers, basically). Trust me - way easier (and cleaner) than fiddling with glue! The finishing touch was Glossy Accents added to the handle, spout and lid of each teapot.

Supplies:
  • Die-namics "Always Time for Tea" die cuts
  • Simple Stories "Baby Steps" patterned paper
  • Crafter's Companion patterned paper
  • Recollections mini roses
  • Glossy Accents
  • Xyron
  • Scrap ribbon
 Challenges:

Monday, April 23, 2012

Gorgeous birthday girl

As many of you know, I lead a wonderful team at Feline Playful - a blog site where we track papercrafting challenges from across the blogiverse - and because of this, every once in while I get a special opportunity. Today, I'm thrilled to be a guest DT member at Party Time Tuesday's! Make sure you visit their blog to see the DT creations - they are quite wonderful!
 
The theme at Party Time Tuesdays is anything goes with Kraft. I was provided with 2 wonderful digital stamps from Crafty Sentiments to work with. I decided to show just how incredibly versatile and easy to use digital stamps can be by paper piecing Rosey - super easy to do, just print off the image and then using removable tape attach patterned paper scraps over the various parts of the image; then run through the printer for a second time and cut out the individual pieces.
Isn't she adorable? Unfortunately you can't really tell in the photo but Rosey is also very 3-dimensional. I cut itty-bitty pieces of foam tape to make her face, jacket and hands pop up, and the ticket itself (from Crafty Sentiments' Ticket just words set 1 printed onto light kraft card) is curved so that it appears to wrap in front of her. 

Party Time Tuesdays ChallengeSupplies:
  • Crafty Sentiments images
  • Prima canvas flower
  • Simple Stories "Baby Steps" patterned papers
  • Kraft card stock

Challenges:

Thursday, April 19, 2012

Baby love

Earlier in the week I shared a mini baby album that I created as a shower gift. Today I'm sharing the card that went along with the album.
Putting this together was pretty straightforward - lots of fussy-cutting and layering but all-in-all a simple card to make.

Supplies:
  • Prima flower
  • Paper elements (cut from Simple Stories "Baby Steps" patterned paper)
  • Embossed paper
  • Spellbinders "Creative Book Pages I" die cut (used to make the card base)
  • Spellbinders Grand Calibur machine
  • Doodlebug twine
  • Kraft cardstock
Challenges:

Monday, April 16, 2012

Baby album using Simple Stories - part 2

Last weekend's baby shower went well - the mom-to-be looked fabulous with her basketball baby bump and my gift of a handmade baby album was well-received. I'm always nervous giving a handmade gift to someone so it was quite a relief to hand it over and see smiles.

Earlier this week I shared the first 2 pages of the album and now I'll share the remainder. 

The album cover is cut using Creative Book Pages 1 on my Grand Calibur. The paper is Simple Stories that has been distressed lightly around the edges. The tree & owls are fussy-cut from a larger piece of paper and although you can't tell in the photo, the owls and some of the leaves are popped up. The banner was also cut from a larger piece of paper and then hung on orange Doodlebug doodle twine. For extra texture, I also added some flourishes (along the left side) that started out as white die cuts but with some Tim Holtz distress ink ended up being the perfect shade.

These 2 inner pages are perhaps my favourite. Both pages have pockets where baby cards and other keepsakes can be kept. The baby's stats (name, date of birth, weight, etc) can be written on the "welcome baby" card placed on the left pocket front. The right side page has a sweet little journaling card.

This page is actually a little album within the album. Untying the ribbon on the left causes the cover to open up allowing access to a collection of photo pockets which can be used to display a bunch of pictures (for the mom who can't choose just a couple!).

Before I sign off, I have to give credit where it's due. Thank you, Kim; your project on the Simple Stories blog site provided me with a lot of inspiration! 

Supplies:
  • Simple Stories "Baby Steps" papers and stickers
  • Prima chipboards
  • Spellbinders "Creative Book Pages 1" die cut
  • Tim Holtz distress ink
  • Kraft cardstock
  • Bind-it-all

 Challenges:

Thursday, April 12, 2012

Oh happy day

Here is another card that started out with the Bo Bunny "Cambridge" card kit that I mentioned in an earlier post. I got a great deal on the card kit but it's been sitting in my stash for way too long waiting for me to actually do something! I've also had this Stampotique stamp that hasn't seen ink so I decided to merge the two by using the card kit design and recommended papers but switching out the suggested chipboard piece (which looked like a shield or coat of arms) for the Stampotique image which is coloured with Copic markers. The sentiment is a Bo Bunny rub-on and honestly, it's just perfect for this stamp - can you hear the sarcasm in her voice?
I'll be donating this card to Send A Smile 4 Kids (which provides handmade greeting cards to children ages 0-19 who are hospitalized). I'm hoping there will be a teenager who will appreciate the attitude.

Challenges:
ATC's & Cards with Attitude - anything goes
Pile it On - all about "S" (Stampotique, sarcasm, spots)
Use it Tuesdays - anything goes using hoarded supplies (card kit papers)

Wednesday, April 11, 2012

Baby album using Simple Stories

I'm attending a baby shower on the weekend and have been busily creating a mini album to act as my gift. Since the baby hasn't been born yet and the sex is a secret, I chose to use Simple Stories "Baby Steps" papers and embellishments as my starting point. These papers are a wonderful mix of pink, blue, green, yellow and orange, all on a base of kraft - perfect for a gender-neutral project.

Rather than share my entire project in one long post, I decided that I would share a couple of pages at a time. So here are the first 2 pages of this super sweet (if I do say so myself - lol) baby album.

To start, I cut all of my album pages from chipboard using my Grand Calibur and the Creative Book Pages 1 die. I used kraft cardstock as my base. For the page on the left, I used a sketch from Sketchy Colors Challenge (see the sketch at the bottom of this post). All of the papers are Simple Stories and have been distressed lightly around the edges.

Next, I wanted to have a spot in the album for multiple pictures so I decided to include some photo sleeves. To make this, I bought a cheap album at the dollar store and cut out 5 of the photo sleeves. I added a strip of pretty paper along the top and then stitched across using some baker's twine to hold it all together. This is the first time I've used the twine and although you can't see it well in the photo, I really like how the stitching finished off the little flip book. I cut out 2 of the Simple Stories 4x6" blocks for decoration. On the first one I added a sticker and chipboard piece. 
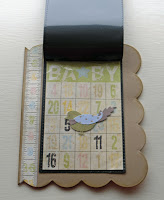
On the last page I added an adorable little chickadee that I created using a brand-new die from Dee's Distinctively Dies. I'm thrilled to be using this die since the creator is one of the owners of a nearby scrapbook store.

Supplies:
Simple Stories "Baby Steps" papers and stickers
Prima chipboards
Dee's Distinctively Dies "Chickadee" die cut
Spellbinders "Creative Book Pages 1" die cut


Challenges:
Bunny Zoe's Crafts - ribbon/twine
Crafting When We Can - things with wings
Creative Mondays - anything but a card
Critter Sketch - critters
Gingerloft - anything but a card
One Stop Craft - pastel & die cut
Paper Sundaes - use at least 2: kraft, lace, die cuts, charms
Pile it on - all about "S" (Simple Stories, sweet)
Sketchy Colors - sketch

Sunday, April 1, 2012

I'm the mother of a 9-yr old?

Every once in awhile I'm shocked to realize how time is just flying by ... today is definitely one of those days! My baby boy (and don't tell him I called him that) turns 9 years old today! Where has all the time gone? It seems like he was my precious little baby one day and then suddenly he became this person with attitude, ideas of his own, and interests that are completely separate from me.
Well you're not reading my blog to hear my whining, right? So here is a card to share.
Luke's favourite game right now is an iPod app called "Jetpack Joyride" so I decided to base his birthday card on that game. I searched the internet and found a picture of the "Jetpack Joyride" character. I printed off 2 copies of him, and then cut him out, popped up the head and hands separately (for a 3D effect) as well as part of the jetpack flame and used this for my central embellishment. The sentiment is computer generated using a font, style and colour that matches the game graphics as closely as I could. The card base has been sitting in my drawer for over a year and is embossed using a Cuttlebug folder. The star circle is a brand-new die from Marianne's Designs that I picked up on the weekend. All in all, it worked out pretty well. My one regret is that I didn't lightly ink the edges of the jetpack man so that the white cut edges weren't so clear. But what really matters is that Luke was amazed and thrilled at receiving the card!

Challenges:
Alphabet Challenge - "D" for dry embossing
Crafty Creations - games
Crazy Challenge - add a sentiment
Creative Belli - 3 shapes (circle card, stars in die cut, long ovals on background)
Fussy and Fancy - anything but a square/rectangle
Love to Create - masculine
Simon Says Stamp - anything goes
Shopping Our Stash - circles or dots
Southern Girls - cards with sentiment
Tuesday Throwdown - outside the box (image outside of the frame)