Monday, April 15, 2013

Storage for baker's twine and ribbon


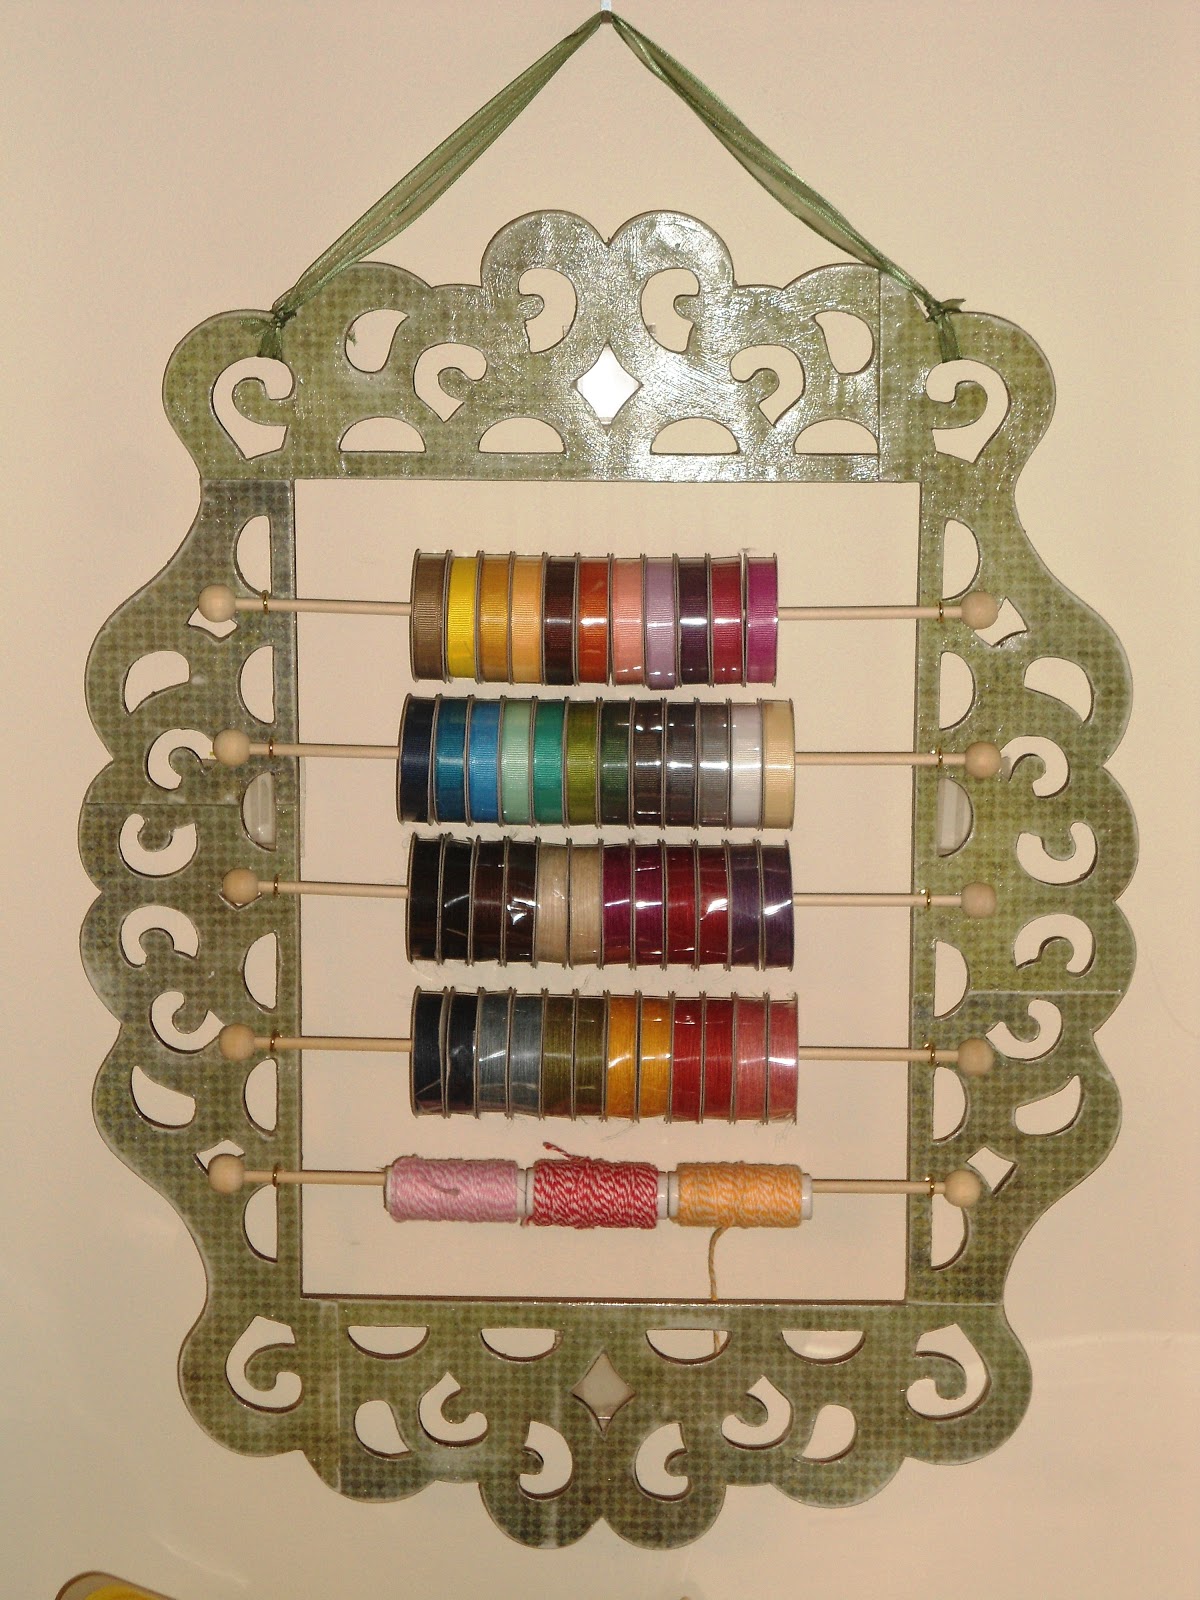
I have to give credit to Amber at damask love for the idea and instructions on how to create this absolutely wonderful hanging display & storage unit for baker's twine. Amber's tutorial is really clear so I won't bother explaining anything about how this was created except to point out that instead of painting the wooden frame I decided to cover it with patterned paper. I used a sharp blade to trim around the designs and then sanded all the edges. It was finished off with a couple of coats of Mod Podge. It was a lot more work than painting would be but I'm pleased with the result.

I've hung the frame in my work area and just love how accessible the coloured twines and narrow ribbons are now.

Challenges:

Artistic Inspirations - anything but a card
Creative Craft Challenges - alter it
Hotshot Crafts - anything
Paper Crafting Journey - monochromatic
Unstampabelles - anything but a card

Wednesday, March 6, 2013

Gotta Catch 'Em All

I'm thrilled with the card I'm sharing today as it worked exactly how I wanted it to. My son had a birthday party to attend on the weekend and the card just had to be Pokemon based. I decided to try creating a card that looked like a Pokeball and opened up to show the birthday greeting.

Creating the Pokeball was actually very easy. I cut 3 circles using my Grand Calibur Circles die cuts in red, white & black. The red & white circles were cut in half and then 1/4 inch removed. I trimmed the black circle so that just 1/2 inch in the middle was left. The "ball" opens using brads as the hinge. The centre black & white circles are popped up separately and then I added a large padded brad in the very centre.

My son was thrilled with the card - especially because I found an image of the newest Pokemon starters to print off for the inside. While making the card I created an extra to donate to the Childrens Hospital as well. The only difference between the cards is the top section of the extra card is left blank.


Challenges:
2 Sisters - fairytale or fantasy
Dutch Dare - for a boy
Eclectic Ellapu - for a child
Papertake Weekly - anything goes
Pause, Dream, Enjoy - for a boy
Pile It On - birthday
Send A Smile 4 Kids - for the boys
 

Monday, February 25, 2013

Boys cards can't be beat

As a mother of 2 boys, I always need cards for males, so I'm really happy to have 3 cards to add to my stash for later use. Each of the cards uses Basic Grey "Oxford" papers and embellishments plus kraft card blanks.


Challenges:

Basic Grey Challenge - anything goes
Here Come the Boys - lots of layers
Eclectic Ellapu - masculine
Daring Cardmakers - hot chocolate (totally inspired by the colour
Lollipop Ladies - nerds

Inspiration:

Card #1:  Feeling Sketchy - sketch
Card #2:  Tuesday Morning Sketches - sketch
Card #3:  Seems a Little Sketchy - sketch
Inspired By - picture inspiration (picked this set of papers/embellies because of the school supply inspiration)


Sunday, February 24, 2013

Easter bookmarks

Still desperately trying to reduce my stack of supplies so that I can walk through my dining room again. I think I managed to use up about 1/2" worth of scrap paper by creating a stack of corner bookmarks (the book page slides in behind the bunny face so the ears are sticking out). These are my favourites - super easy to create, but cute as can be. I've made enough to use them for school Easter goodie bags. If you want to try making your own corner bookmarks there are a tonne of tutorials available online but my initial inspiration came from Positively Peaches Monster bookmark.


Challenges:
Allsorts - animals
One Stop Craft Challenge - for the kids
Hotshot Craft - anything but a card
Creative Belli - hearts
Deep Ocean Challenge - "B" (for bunny, bookmark & brown)

Sunday, February 17, 2013

What a Hoot

Another project created from some of my BFF Jacqui's stash. This time she gave me a page kit from Lickety Split and even though the page layouts included in the kit were adorable, I decided to instead convert it into a mini album.

I included both chipboard and acrylic pages but otherwise kept the album design simple since the papers were so busy. All of the embellishments (flowers, leaves, brads, die cuts) came from the page kit - all I added was some cardstock and the album pages. Oh, and instead of binding the pages with rings, I used ribbon from my own stash.
 
I can't get over how quickly this album came together. So easy when all the papers & embellies are together. And even though I didn't use the page design provided in the kit, it really helped to give me ideas. Also so much easier when I just sit down and do it instead of over-thinking the process!
 
Challenges:
Glitter n Sparkle - anything but a card
Allsorts - things with wings
Alphabet Challenge - anything with wings
Hotshot Craft - anything but a card


Wednesday, February 13, 2013

Making card kit projects unique

I picked up a card kit at my LSS (on sale!) and spent an enjoyable evening putting the cards together but I really wanted to adapt the cards and make them more unique and personal to my style. I decided to take the finished card kit cards and use them as toppers on larger cards with additional layers & embellishments. This worked great since the kit cards were quite small and there was plenty of leftover paper.

The first card is based on a sketch from Tuesday Morning Sketches (see below). I rotated the sketch and used the kit card as the central "image". I chose to have lots of white space to avoid having the final card be too busy as well as keep it looking fresh & crisp.

Challenges - "Merry & Bright" card:

Crafty Hazelnut's  - Christmas card without snow
Pal's Paper Arts - colour combo
Tuesday Morning Sketches - sketch


The second card is based on a sketch from Cupcake Craft. Again, the central "image" is the kit card with additional paper and ribbon elements added. Instead of stretching the ribbon across the card, I tried looping it - I really like the extra dimension and interest. I added some red Stickles to the tree and the corners of the "celebrate" banner - after all, Christmas cards can never have too much glitter!

Challenges - "Celebrate" card:

All that Stickles - Xmas red stickles
Cupcake Craft - sketch
 Pretty Little Ribbon - anything goes
Tuesday Throwdown - anything goes

Thursday, February 7, 2013

Run like the wind

Thanks to my BFF, Jacqui, and her need to clean out some of her stash, I found myself gaining a whole pile of paper packs and kits over the weekend. I certainly don't "need" any more stuff but I just can't say no to free anything. To relieve my guilt at adding to my pile of supplies, I decided to use this new stuff as quickly as possible. Here is the first layout that I made:
The papers and rub-ons are from the Reminisce "Genuine Boy" collection and the page design is modified from a 12" x 12" Photo Express page kit (from a couple years ago when they still had scrapbooking).

Challenges:
Craft room challenge - make your own embellishments (the gears are created by fussy-cutting details from a piece of patterned paper, adding some rub-ons, then matting on card).
Papertake Weekly - anything goes
Totally Papercrafts - make your own embellishments

Wednesday, January 30, 2013

We might as well dance

Last week when my son told me about a dream he had where animals were dancing around on 2 legs, we both got a little (a lot) goofy and laughed ourselves silly imagining bulldogs in tutus and kittens doing plies. I couldn't get the images out of my head and so created this art journal page inspired by my son's creative idea.

The background is made using Dylusions inks and a mix of stencils. I'm still scrubbing the ink off my fingers cause I had so much fun playing with these fabulous inks. I used stamps from Dylusions as well - some of the leaves are stamped & coloured directly onto the page (heat-setting will allow you to colour with Copics over water-colour sprays!) whereas others were stamped on white card, coloured and fussy-cut.

Here's a close-up of one of the dancers. I found a vintage black & white photo of several ballerinas online, printed it off and coloured with Copics. I fussy-cut the dancers out, ran a black marker along the edges (to give some definition and help the images stand out more) and then chopped off the  heads! It was hard picking out the right animal faces but my son liked the expressions on the final choices.
 
I think the page needs something more - the space between the pink & green ballerinas seems too empty. Any ideas or suggestions? I'm not going to seal the page for awhile yet in hopes that inspiration will hit.
 
Anyway, I'm new to art journalling but I'll be doing more of it, especially if I can get the kids to share more ideas! Thanks for looking!
 
Challenges:
Crafty Creations - anything but a card
Simon Says Stamp - anything goes
Marker POP - pink
Totally Papercrafts - let's dance
Copic Marker Europe - anything goes with Copic
By the Cute & Girly - cute & girly

Bird bringing best wishes

Today's card didn't photograph very well - the white flowers look way brighter than they really are. Believe it or not but this card started as a napkin! The centre block is cut from a napkin with paper clay added under the bird to create a 3-D look. Once everything had dried enough I added touches of H2O's to the bird & surrounding flora to create a bit of shine.
I have to give credit for the idea (of using napkins and clay) to Debi as she taught this technique at a class at Country Lane Scrapbooking. My only complaint about how the bird worked out is that the backing cardstock wasn't thick enough and so it warped as it dried. I was able to flatten it enough through the use of lots of Sookwang tape and a heavy book but I also matte the image several times to give it even more stability.

To turn the bird into a card I used the sketch at Sketch Saturday - I like how the ribbon is woven through the layers of matting.  The background paper is Basic Grey plus gold foil paper and brown cardstock from my stash.

Challenges:
Top Tip Tuesday - luscious layers
Paper Playtime - use some brown
Scrappy Frogs - something new (new technique)
My Tme to Craft - things with wings
Sketch Saturday - sketch

Monday, January 21, 2013

Special packaging for a special friend

I finally got this gift to my BFF over the weekend so I can share it here on my blog. The gift inside wasn't anything special but I made up for it with customized wrapping.

I was inspired in creating this envelope wrapping by a posts at Home Sweet Homemade. I started with a scrap of wrapping paper which I cut to size and then folded so that the gift inside was fully covered plus an extra 2 inches at the top for a flap. I found this absolutely perfect paper in my scrap bin for the flap - I just love the shaped edge. Even though the envelope is glued together at the sides, the final touch was the ribbon woven through the gold eyelets (for extra strength and shine).

Challenges:

Sunday, January 13, 2013

Brrrr...

I just adore how this (very late) Christmas card worked out. The main image (the seal) was cut from a Christmas tag that I used last year (The Paper Company Studio); he was just too cute to throw away! I think I spent more time playing with his bristly whiskers and making his googly eyes bounce around than I did making the card. The papers are all from my scrap bin and the "Brrrr" sticker (Sandylion Stickers, "Winter Collection") has been in my stash for years.

Challenges:
Corrosive Challenges - out with the old
That Craft Place - snowy Christmas
365 Day Cards - 3D element that moves (check out his googly eyes and whiskers)
Simply Create Too - snowy
Aud Sentiments - winter sentiment
ABC Christmas Challenge - animal
Creative Belli - winter
Sisterhood of Crafters - winter

Friday, January 11, 2013

Resemblance to dinos is pure coincidence

A couple of friends are hitting landmark birthdays this year and when I saw Lucy Abrams' card in the January/February 2013 issue of Paper Crafts Magazine (page 55)  I just knew that I had to scraplift the design. I printed the sentiments directly onto kraft card blanks (in case you can't read it from the picture, I've put the sentiment text below the photo). The dinos (from Dustin Pike's Doodle Dragons Studio) are printed on patterned paper and then paper-pieced and coloured. The papers are all from Basic Grey "Granola". The grey ribbon is an upcycle item as it came wrapped around a blanket that I bought a couple of months ago (love "free" stuff).
*Image is for entertainment purposes only. Any resemblance to a real person (i.e. you) is purely coincidental. 
Challenges:
Charisma Cardz - birthday
365 Day Cards - kraft
ABC Challenges - CAS
Tammy's Scrapin Corner - manly cards
Basic Grey Challenges - anything goes

Monday, January 7, 2013

My boys

I picked up the Winter 2012/13 edition of Canadian Scrapbooker magazine on the weekend and was totally inspired to create a couple of pages scraplifted from its pages.

Alex @ 7

The first layout is based on one by Sherri Funk that appears on p. 26. I've used Bella Blvd "Man of the House" papers and Echo Park "Note to Self" element stickers. My favorite part of this layout is the monochromatic line of numbers (ending with "7", my son's age) along the main image.
 
Luke @ 9
 
The second layout is based on one by Joanne Burton that appears on p. 83. I've used Simple Stories papers"Aweso{ME}" papers and "Destination" element stickers. The hexagons were cut using Spellbinders dies. The sweater my son is wearing is so dramatic with te black stripes that I added the black flourish to the shield to balance it. I think it works pretty well.
 
Challenges:
Crafty Creations - anything goes
Scrap Fit - use stars (layout #2)
The Paper Girls - use ledger paper (2 of the hexagons are made with ledger paper)
Unstampabelles - use 1 or more dies (hexagon die on layout #2)